

This practical life activity is designed for children between the age of 3 and 6 to guide them on how to use a wrench.
Learning to use the fixed key is an exercise that teaches the child the correct way to do some household chores. Additionally, it helps to stimulate a child’s imagination through the activity of assembling, disassembling, and building.
This activity is an extension of the nut and bolt activity introduced earlier.
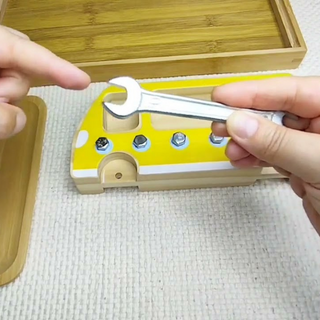
Montessori Wrench board
The set contains a wooden block and six bolts that screw into permanently fixed, threaded receptacles. Additionally, the board has two insets; one for the wrench and one for holding the bolts once they are removed. The wrench is made of a chrome-plated alloy and features both open-and-closed sockets for engaging the bolts. It helps children to learn how to use a wrench by removing and re-inserting six hex-head bolts using the supplied tool.
Materials Required for the Wrench Board
- A small tray
- A board with tapped holes.
- Hex head screws of the proper size for the holes.
- A fixed key
Benefits of Montessori Wrench Activity
- It promotes hands-on learning of basic skills required to do daily household chores.
- It promotes the development of a certain degree of autonomy and independence.
- It improves coordination and concentration.
- It strengthens a sense of order and fine motor skills.
- It provides a space for children to learn how to solve or overcome a specific challenge.
How To Introduce The Wrench Activity To The Child?
In this activity, the child will learn to use a fixed key using a wrench.
- Ask the child to bring the wrench activity tray to the table.
- Familiarize the child with all objects that are on the tray. This also helps to develop the vocabulary of the child.
- Unscrew all the screws and place them in the smaller container of the tray.
- Keep the wrench in the bigger container of the tray.
- Using your hand, slowly and clearly, insert a screw into each of the holes.
- As shown in the video, using the open end of the wrench, tighten each screw.
- Tell the child this is how we tighten the six-head screws.
- Once all screws are tight, use the open-end wrench to loosen and remove each screw.
- Tell the child this is how we unscrew the screws using a wrench.
- Place the tools on the board and invite the child to try the activity independently.
Watch the video to show the child how to use a wrench to screw and unscrew the fixed screws.
Related Videos
To watch more Montessori practical life lessons, click here:
Video created by: Alejandra Jurado
Tags
- english language
- Practical Life
- primary level