

This sensorial lesson is designed for 3 to 6-year-old children. It introduces the child to a triangular box of constructive triangles. This box is the third in the series of Constructive Triangles.
What are Montessori Constructive Triangles?
Montessori Constructive Triangles are introduced as sensorial material at an age of 3-6 years old and as a geometry material at an age of 6-12-years old. There are usually five or six boxes with various types of triangles to create rectilinear figures or right angles. It is called “constructive” because it introduces the concept of combining visual images to form different shapes.
Triangular Box of Constructive Triangles
The box contains different constructive triangles like equilateral, obtuse, and isosceles of various sizes. These shapes, when combined, form different geometric shapes like a parallelogram, rhombus, hexagon, etc.
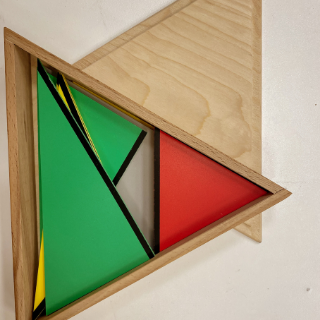
The triangular box consists of:
- 3 yellow isosceles obtuse triangles with black lines along both sides of the obtuse angle
- 4 red equilateral triangles: one red triangle with black lines on all sides and three red triangles with black lines on only one side
- 2 green scalene right triangles with black lines along with the longer of the two sides of the right angle
- 1 large grey equilateral triangle without black lines
In this video lesson, the child learns the different types of triangles and how they combine to form an equilateral triangle. It also helps in developing a child’s muscle memory, order, and concentration. Such activities enable the child to practice fine motor skills and hand-eye coordination.
How to Introduce the Constructive Triangular Box to the Child?
- Invite the child and tell them that today we are going to learn about triangles using a Triangular box
- Remove the lid of the box
- Take out all of the triangles and place it on the working mat
- Now, choose the gray triangle and hold the triangle around the edges and tell the child that this is an equilateral triangle
- Similarly, introduce each type of triangle.
- Now, pick one of the green triangles and place it on the mat with a black line in a vertical direction
- Pick the other green triangle and place it joining the black lines to make it a big green triangle.
- Place the gray triangle on the joined green triangle to show that these two green triangles make the same shape and size as the gray triangle.
- Repeat steps 4-6 with Yellow triangles by following the black lines
- Repeat steps 4-6 with Red triangles by following the black lines
- Mix up the triangles and allow the child to make the large triangle out of the smaller triangles, as shown in the video.
- When the child has created all three triangles out of the other triangles, guide the child to place them in the correct order, i.e. red triangle, yellow triangle, green triangle, gray triangle.
Watch the video to learn more about constructive triangular boxes. This practical method is a fun and innovative way to help them get a better understanding of different triangles.
Other Constructive Triangles Boxes video Lessons:
- Constructive Triangles: First rectangle box
- Constructive Triangles: Blue rectangle box or second rectangle box
- Constructive Triangles: Small Hexagon Box
- Constructive Triangles: Large Hexagon Box
For more math resources, visit: https://theglobalmontessorinetwork.org/math-resources/
Video Created by: Joanne Shango
Tags
- English
- Math
- primary
- sensorial