

This Math video lesson is designed for 6-12-year-old children to help them practice addition using the Montessori addition strip board.
What is the Addition Strip Board?
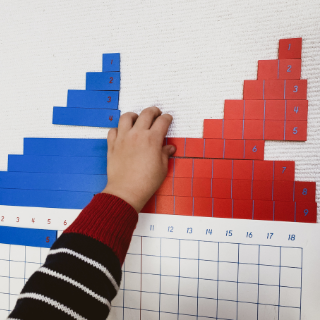
An Addition Strip Board has two parts: a board and strips.
- The board is divided into squares (each 2cm x 2cm) across from left to right and 11 squares from top to bottom. The topmost squares are numbered 1 to 18; from 1 to 10 in red and from 11 to 18 are in blue. The board is divided vertically by a red line after the number 10.
- The strip box of the strip board consists of two sets of strips, namely red and blue. Each set of strips has numbers written from 1 to 9. The red strips are further divided into small squares with blue lines. The end square of each strip is marked with the symbol that corresponds to the number of its squares.
Purpose of Introducing the Addition Strip Board to the child
Montessori addition strip board teaches children the mathematical concept of adding numerals 1 to 9 more abstractly as it leads the child through all the combinations in addition. There are no combinations beyond 9 + 9.
A red line vertically dividing the board shows up when the addition exceeds 10 points. For example, when we add 7 + 5, the red line shows how many points went into 10 and how many points were added extra.
It works like the little counting cards in the snake game at every ten. The red line, similar to a counting card, teaches children how numbers can be divided into two sections; one section is for completing 10, whereas the other section is for completing 11 to 18.
Control of error
As the child counts using blue and red strips, the sum doesn’t exceed beyond the sum of 9+9
How to Introduce the Addition Strip Board to the Child?
- Invite the child to the table along with the addition strip board.
- Tell them, “Today, we will learn how to add numbers or addition.”
- Introduce the child to the addition stripboard. Show the child boxes, the number at the top of the board, and the red line on the board, which shows us we have reached the sum of ten.
- Tell the child this strip board will help us find the sum of numerals 1 to 9.
- Show the child the strips you will use for addition.
- Have the child take out all the blue strips one by one and read the numbers written on it.
- Have the child place them in order to the left of the chart.
- Now, ask the child to take out the red strips and place them in order to the right of the board, as shown in the video.
- Show the child how red strips are and differ from blue strips.
- Have the child choose one blue strip (let’s say, numeral 3)and place it in the first row.
- Using red strips, ask the child to place them after the blue strips, as shown in the video. Repeat placing the red strips and find the answer to the sums after the blue strip in the following manner:
- 3+1=4
- 3+2=5
- 3+3=6
- 3+4=7
- 3+5=8
- 3+6=9
- 3+7=10
- 3+8=11
- 3+9=12
- Show the child how to find the sum while pointing it out on the chart.
- Ask the child to note the answers.
- Have the child replace the blue strips and repeat for the whole table of 1.
- Encourage the child to do all the tables.
This material allows the child to practice the operations of addition with different sequences on an addition strip board, as shown in the video.
Watch the video and learn to sum the numerals in a fun and innovative way to instill a sense of logical thinking in the child. It helps the child to get a better understanding of complex math concepts.
Related resources
For more math resources, click here.
Video Created by: Joanne Shango
Tags
- admins and guides
- english language
- practice montessori